Saturday, November 2, 2013

Common Core? There's an app for that...

Cover artCover art

Seems like there's an app for everything these days.  I heard about these apps at a recent conference I attended.  It's common core on your mobile device.  My first thought was, "Why would I ever need that on my smart phone?"  I don't have a tablet.  In fact, when it comes to writing lesson plans, I'm a bit "old school" and prefer a printed version of the CCSS.

So, while I could see some people who use tablets or iPads in their classrooms may find this app helpful, I was a bit skeptical.  And then the network went down at school.  And I had left my printed copy of the standards at home.  I couldn't even access my documents on our school server where I had saved a copy of the standards.  Just as I was about to growl in frustration over not being able to plan during my planning period, I realized I had one more option:  the APP!  I downloaded it quickly for free and was able to easily continue my planning session, no problem.

If you're like me, though, you're thinking that it's hardly worth the bother to download this app for the rare occurrence of a total network shutdown.  You may be thinking that you'd never need this on your phone.  I get it.  I was with you.  And then I was in Hobby Lobby buying some crafting stuff and saw a pile of cool educational games and activities.  Since CCSS is new to our state this year, plus I'm back in the classroom after several years in the ESL room, I haven't yet memorized all the CCSS for each grade level.  I wanted to buy a math game that my students could play, but didn't know which ones would hit the standards for my grade level.  Out came the phone and that handy little app.

I'm sure there are other great reasons to have this app.  I'll maybe encounter them this year.  If you have any experiences where this app has been helpful, I'd love to hear about it here!

(I don't work for either app company, but just wanted to share how helpful they could be.  Please go to your usual app store and search for Common Core.  The Mastery Connect app and the Education Electric app are the two pictured above.  These are the only two I am aware of that are free apps fir CCSS.  You'll need to read their details and requirements in order to determine whether these are right for you.)

Thursday, October 10, 2013

Classroom Library Organization? There's an app for that...

One of the things I needed to do this year was update my classroom library to include Lexile levels.  The school I where I'm teaching uses a reading test three times each year which gives us each student's Lexile range.  I'm used to the Guided Reading levels.  No matter what you may find about how those two systems work, they don't actually align well.  They use totally different features to determine reading level.

So anyway, I needed to make labels for my books that had Lexile levels included.  (I also included Guided Reading and Accelerated Reader if I could find them.)  I'm so glad I found two AMAZING resources to find these levels.

First, I used "Classroom Organizer."  Check it out here:  http://classroom.booksource.com/ 

I was able to quickly scan the barcode on the back of each book with the smartphone app.  The site then provided me with an Excel spreadsheet of every piece of information they had about the book (title, author, levels, genre, list price, etc.).  Some books had tons of information.  Other books had very little information.  Since it was all in a spreadsheet, though, I could easily sort the books and use other resources to find the missing pieces.

Scholastic has their "Book Wizard."  This is the resource I went to when I needed more information.  Check it out here:  http://www.scholastic.com/bookwizard/ 

Next, I took the spreadsheet and created a "mail merge" document in MS Word.  I used the address labels feature and placed Title, Lexile level, GR level, AR level and AR points all on a small label and printed them.

Now, you can purchase labels and try to get everything to line up just right, or you can print on paper and then run it through a sticker machine.  What?  You don't have one?  You've got to check out the Xyron machines.  I use them for everything!!

Product SmallImageXyron


http://www.xyron.com/enUS/Categories/Creative_Station/9__Creative_Station.html

You can find these in many of the big box craft stores, online, or sometimes at your local scrapbooking stores.  They will do not only sticker-making, but also laminate and make magnets.  If it's flat, it can become a sticker!   No electricity needed -- you crank the handle by hand and out slides  your project.  The machines come in many sizes.  This 9 inch version is my favorite machine at home, but I also have the 5 inch version in my classroom and the 1.5 inch version at home.

So, with just a few minutes of scanning with a phone, an hour of searching for missing book levels, a few minutes to mail merge a document and print,  and seconds to crank them into stickers, I have labels ready for several hundred books.  Now, if I could just remember to bring them to school, I could start attaching them to my library.  :)

Hope this Helps!
Heather Q


Sunday, October 6, 2013

I Scream for Ice Cream! (Homophone match up activity)

I finally got the graphics worked out on this one.  (Strange black spots were appearing on the printer, but not on the screen.)

Ready for classroom use, it's the Ice Cream Match Up for Homophones!


Print on cardstock, cut out, and fold the cones around behind.
Instant center for practicing homophone definitions!

Check it out at my TPT store!  (Click here)  

Exit Tickets on Sticky Notes!!

Need a quick Exit Ticket for your students?   Wouldn't it be great to have a sticky note version that students could stick on your door or wall as they exit your room?  Well, I thought so, too!

I created a file of 8 different Exit Tickets (shown in the picture above) for all kinds of different situations.

To create them, simply print the file one time, place a 3x3 inch sticky note on top of the page, put it back in the printer the same way, and print again!  


Each page holds 6 of the same exit ticket.  If you don't want them on sticky notes, you can print on paper and cut apart.  Either way, you'll have a great informal assessment or closure activity for your students to complete at the end of a lesson.

Check them out at my TPT Store! (click here)

September was a very busy month!

Whew!  The first month of school is over and I made it through. Wow!  I'd forgotten what that first month in the classroom can be like.  The last three years as an ESL teacher, the first month was all about assessing new students and completing paperwork.  That's all important, but not quite as exhausting as teaching routines and procedures as well as content to students you hardly know yet.  I was doing 12 hour days plus going in on the weekend, not to mention coming home with papers to grade and projects to complete.

I think I've found that groove, though.  The one where you know that there's a lot to do, but it's not so overwhelming.  You know what's coming, you know your students well enough to know how they're going to react to things, you've had time to prepare some of the basics.  Basically, you can see the light at the end of the tunnel and know that it is NOT a train!

I've got some more posts coming for you this week.  I presented a few of my new products at the Michigan Teaching English to Speakers of Other Languages (MITESOL) conference on Saturday, so I will blog about those latest endeavors.  I've also got some great apps I've learned to use recently that you may want for your smart phones/ipads/tablets/etc.  I may even manage to get some photos of things I've got going in my classroom right now. Stay tuned!!!

Saturday, August 24, 2013

Classroom coming along nicely

Well, it's been a bit slower than I'd like, but it's finally starting to take shape.  Here are some sneak peeks of my classroom.  It's not totally ready for next week's open house, but I took pictures of some of the newest pieces.


Lots left to do, but I'm really loving my color scheme.  How is your classroom coming?
HQ

Finally joining Bloglovin -- Follow me there if you'd like

<a href="http://www.bloglovin.com/blog/10428135/?claim=jqrb7bg9v7h">Follow my blog with Bloglovin</a>

Hoping this sets up my blog in Bloglovin.  Watch for buttons on my sidebar as soon as I figure that out!

Wednesday, August 21, 2013

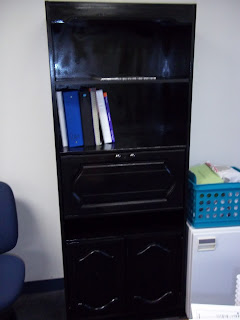
Bookshelf is painted and in my classroom!

I bought this bookshelf at a thrift store a few weeks ago.  Two cans of spray paint later, and new cabinet hardware, it's in my classroom and ready to use!  I'm loving this piece of furniture.  I'm thinking about adding some accents to it, too, but not sure what to add or if I've got time for it.


What do you think?  Does it need some white accent paint in the grooves of the doors?  Does it need contact paper on the shelves?  Does it need something else?  Am I being overly crazy in thinking that I should do anything more to it in these 2 weeks before school starts?
HQ


Tuesday, August 20, 2013

Attendance and Lunch Count Board

Here's a picture of that board I got earlier this summer.  I've got magnet clips with cute little smiley faces :) on them.  Each student will get a number at the beginning of the year.  In the mornings when they arrive, they'll take a card for the type of lunch they are having (blue = lunch from home, orange = school hot lunch, green = school salad) and hang it with their clip.  I can easily see who has arrived and their lunch choice so I can quickly enter it into the computer system right away.  One student will have the daily class job of removing the cards once attendance/lunch count are entered. 

Do you do something like this?  Do you use magnet boards in other ways?  I'd love to hear about it!  Comment here.  Share your blog address.  I'll come visit! 
HQ

Monday, August 19, 2013

Welcome sign ready to hang!

I'll be in my classroom a lot this week, since we have meetings all week the following week.  I need to get my room all set up and pretty ASAP! 

So, here come the posts of what I've been working on and what will be part of my decor as I get going.  Today's post is my new Welcome sign.  I painted it myself.  This was so much fun to do.  Years ago, a student gave this sign to me, but it had really old-fashioned teacher stuff like apples and a teacher's desk.  It was cute, but not my style these days.  Nothing a few scrapbooking supplies won't fix!  :)


What do you think?  Do you have a welcome sign in your classroom? I'd love to see a picture!

Wednesday, August 7, 2013

Back to School "Before" Pictures

I did it.  I went into my classroom to actually DO something in there.  I've stopped by a few times this summer for other reasons and poked my head inside to grab a manual or measure the window for curtains.  Today, though, I actually spent time in my room. 

It's been several years since I've had my own classroom.  I've been an ESL teacher with an office for the past few years, teaching my lessons at a table in a little hallway nook. Before that, I was a substitute teacher/grad student since I was new to the area and jobs were scarce.  Before that, I was a "Long Term Leave Replacement" teacher in a few different settings while my husband worked on a temporary grant at a major university in New Jersey.  I haven't actually had my own classroom (where I wasn't a temporary 1 year leave replacement in someone else's room) since the spring of 2004.  OMG!  That's a loonnnngggg time!

While I've had lots of experience keeping myself portable and using another teacher's space/materials/organizational systems, it's been years since I've had to organize myself for myself in my own space.  Know what I mean? 

So, today I went in.  It was a daunting task.  At least the previous teacher left it very empty for me.  And the custodial staff did an awesome job of cleaning it all for me.  But I had to just stand there and look at the space for a little bit.  I needed to see its potential.  Since I've been an ESL teacher at this school for a few years, I knew what the previous teacher in that space had done with the desks, the tables, the bookshelves.  I needed to figure out what's going to work for me. So I stood there.  And stood there.  Then I took a few pictures and stood there some more.

It's very clean, isn't it?  
Everything had been shoved to the front so the custodial staff could clean the carpeting.


 Well, bookshelves on the table make the floors easy to clean.
Plus, they're empty, so there are lots of opportunities for how to use them at this point.


And then I opened the...


 CLOSET of DOOM!!!
dun dun dun...

I had known it was there.  I was trying to forget about it all summer long.  Everything this teacher left behind is shoved in here.  There's no real organization.  The shelves are drooping.  The heaviest stuff is on the top.  The bottom has a lot of space only because our old curriculum had been boxed up for disposal and one of our administrators just came in this week and got it.  Otherwise, that part had been full the last time I looked at it.

Well, I couldn't do it today, either. I closed the closet doors and pretended it didn't exist.  Perhaps I'll look at it tomorrow. :)  Instead, I spent several hours arranging furniture, testing different options before I start filling up the bookshelves and desks.  I was sweaty and exhausted, but I think I know how it's going to be set up. 

 I still don't have all the furniture where I want it.  I just couldn't move a couple of things by themselves.  My husband has offered to help on Friday morning, so I'll save it for him then.  I didn't take any pictures yet because I'm not totally sure there's been an improvement yet.  

But don't worry!  I'm going back in tomorrow and the next day and will be working on some great projects over the weekend to turn this boring, plain, empty room into one that is vibrant, exciting, and fabulous.  Just wait - you'll see!  (Hey -- maybe you should follow me so you actually remember to come back and check?  Just a suggestion!)


Saturday, August 3, 2013

One month left!

I enjoyed my summer, but now it's time to get down to business.  School starts for me in exactly one month.  I have only 31 days to get everything ready for the first day of school in a classroom that is new to me.  I'm trying not to freak out!

This year, I'm going to be prepared ahead of time, right?  It'll all be done 2 weeks early and I'll be able to relax during the professional development meetings and concentrate on all the new learning, right?

Taking another slow, calming breath...


Anybody else feeling this way?

Friday, August 2, 2013

DIY magnets and push pins

Remember this picture from a few weeks ago?


Well, I made them! 

I've got 12 magnets, 12 push pins, and 12 extras that I haven't totally decided what I'm going to do with them, but they were my first set and I wanted to make sure it worked.

It was easy (but the dry time takes FOREVER!).

Mix the plaster as directed on the package.  Pour into mold.  Let dry.  Paint.  Spray with clear epoxy.

If you want to add magnets, it was easiest to fill the mold halfway full, then wait a few hours for it to dry.  Next, place the magnet in the mold and fill the remaining space with plaster. 

The push pins were tall enough that I could add them right away. 


So, they're blue and shiny.  But are they too plain?  I can't decide if I want to doodle on them or bling them up or just leave them as is.  Any thoughts???

Thursday, August 1, 2013

Poke cards are up (3rd grade Math vocab set)

I've listed a set of "poke cards" in my TPT store for 3rd grade math vocabulary.  If you've never seen poke cards in action, they're an awesome self-checking activity for students.  Click here to go to my TPT store or follow the link on the right.

The students read the question, poke their pencil (or other tool) in the hole under the answer they believe is correct, and then flip it over to check.


These will be used at the beginning of the year as review for my 5th graders to practice on their own. 

A fourth grade math vocabulary set is coming soon, too!

Thursday, July 18, 2013

I Love Back To School Sales!!!

I am so addicted to school supplies!  I love shiny new notebooks and sharpened colored pencils.  I can't get enough folders or glue bottles. 

Thank goodness for Staples and Office Max.  Do you know about their policies for teachers?  Both stores have good sales going this week.  At Staples, with the teacher reward card, teachers can buy more than the limit on sale items and will be credited on their rewards card the difference between regular price and sale price.  So, those penny deals?  You pay 1 cent for the first 2 (or whatever the limit is) and then spend regular price on the rest up to 50 items.  Then they send you your rewards with the difference to spend like a gift card.

At Office Max, teachers can buy double the limit as long as you have their teacher's reward card.  Plus, for every $75 you spend in a quarter, they'll send you $10 to spend like a gift card.  This week, I bought a whole bunch of PURPLE pens for 25 cents/10 pack.  They also had a great deal on AAA batteries, which our house never has enough.  I spent $16.99 on a huge pack and will get $16.98 back in my rewards in a few months.  I love those rewards coupons.  It's awesome to go back in October and grab the things that didn't go on sale in the summer.  New electric pencil sharpener, here I come!!

I don't work for either store.  I don't get any kind of special deal for mentioning them on my blog.  I just wanted to share a couple of great resources for any teachers out there that may not have realized these services were available. 


Wednesday, July 17, 2013

Look at what I've got!

So, I've got great projects coming soon.  Hopefully this blog will help keep me working on stuff like this so I'm ready in the fall.  It will help keep me accountable if I post here that I'm going to do something.  I'll be much more likely to conquer the procrastination habit if others may come look at my blog to see my progress.  Here are my "before" pictures of several classroom decor projects.  Let's see how long the "after" photos take!


I'm going to turn this into my attendance board!  This is a magnetic and chalkboard covered canvas with printed inspiration on it.  I think it was $14.95 at Meijer and I LOVE it!!  Each of my students will get a magnet with their name on it to place on the board when they come in each day so I can take attendance.  I'm even thinking I'll have little slips of paper to put under the magnet to show whether they are eating hot lunch or cold.  I can't wait to get this up in my classroom!!


So, then I found this ice cube mold in the shape of little stars at Meijer, too.  I'm going to make my own magnets in star shapes using the Plaster of Paris and then paint them to match my black and white and turquoise theme.  I think that I will make little shooting star tails for their lunch choices.  Won't that be stellar???  (sorry -- couldn't resist that pun)


Now for my Party City trip...  I found a vinyl tablecloth to try making sanitize-able cushions for my classroom reading nook.

I found those paper fans to hang over each group with their group number on it.

I also bought some square blue plates.  I've got a few ideas for how I will use those, but I'm going to keep that a secret until I've made some decisions. 


Help keep me accountable this summer.  I don't want to spend my Labor Day weekend freaking out about the first day of school!  :)


Store #1 is open!

I finally put a few things in my Teacher's Pay Teachers store!  Check out the link on the right to see what's up and available.  Know that more will come soon!!! 

Tuesday, July 16, 2013

I've been "Out of the office..."

I was all excited and ready to post a bunch of stuff on my blog, but then time got away from me.  (Unfortunately, that's a habit I need to work on breaking!)

I spent several wonderful days at a family wedding in Montana.  It was beautiful.  The wedding took place in Red Lodge, which is in the foothills of the Beartooth mountains.  It's right along the highway between Billings, MT and Yellowstone National Park.  The town is full of great resorts and B&Bs.  There are quaint little shops full of the cutest things, lots of restaurants with delicious noms, and scenery that stretches for miles.  Here are a few pictures to tide you over for now.  Tomorrow, expect some great things on this blog! 


Hmmm.... how can I use this in the classroom?  I'm sure there's a way!

Wednesday, June 26, 2013

Prettier than cardboard

I need to get ready for my new classroom in the fall, but it's not ready yet.  They're still cleaning it and I can't get in to do much.  So I've got a lot of projects I'm working on and a TON of stuff in my basement.  I decided to get some of those cardboard file boxes from my local office supply store.  I had planned to get the cheapest ones possible because they'd be temporary.   But, when I got there, I saw THESE:

DiVOGA File Storage Box


 They were only a little more expensive than the basic cheap ones, so I splurged.  I plan to decorate my classroom in black and white with a splash of blue, so I thought these would be PERFECT!!

I excitedly began to fold the 6 boxes and lids into shape.  Then I looked at my hands.  The black was rubbing off on my fingers!  EWWWW! 

I decided to get creative and cover the lids with contact paper.  Here's my step by step tutorial for you on how to cover a box lid with contact paper smoothly.

1st:  Measure and cut the contact paper a few inches bigger than the box lid (enough that you can cover the sides and roll the excess to the inside of the lid.


2nd: Peel the backing off of MOST but NOT ALL of the contact paper -- you'll need somewhere to hold it where it won't stick to you.


3rd:  Line up the side of the lid with enough excess that you'll be able to roll it over to the interior.


 4th:  Lay the lid flat on the table carefully so that the contact paper has no/few wrinkles.


5th:  Peel the remaining backing paper off of the contact paper and press against the side of the lid.


6th:  Cut a slit in the contact paper from the edge of the paper to the edge of the lid.  Do this to all four corners, then fold over the two sides.


7th:  Cut the contact paper where the folded part meets the table. Do this at all 4 corners. (I used binder clips to help hold down the contact paper as needed.)


 8th:  Fold the contact paper over the side.  Then fold in the corners.
9th:  Cut a slit in the contact paper to make a triangle in the corner. Fold down the larger part.  Then fold the triangle part into the corner of the lid.  Repeat on all four sides.


 10th:  Sometimes contact paper does not hold well on certain surfaces.  Black duct tape did the trick here!


Here are the finished boxes:


But wait!!! As long as I have the duct tape out... let's cover those handles so that I don't get black stuff on my hands when I move the boxes.


Well, that's it for now.  Tomorrow's another day!  :)
HQ

Monday, June 24, 2013

Welcome to my new blog!  Please allow me to introduce myself. 

I've been teaching since 1998, in three different states, and in many different capacities.  I have worked in affluent private schools, poverty-stricken urban public schools, and publicly-funded-but-privately-managed charter schools.  I have taught 4th, 5th, and 6th grades, multi-age classrooms (4/5th or 5/6th), K-2 gifted and talented, Kindergarten ESL, and Adult ESL.

This fall, I am scheduled to return to the classroom after a few years of teaching ESL.  I am very excited to be preparing a classroom all over again, but there's a ton of work to be done.  I will be teaching 5th grade again this year.  This blog is going to be my place to share my progress this summer as I set up for this new endeavor.

I look forward to sharing my ideas, projects, and progress with you.  I'd love to connect with others who are preparing for the classroom.

See you tomorrow for my first project posting!
HQ